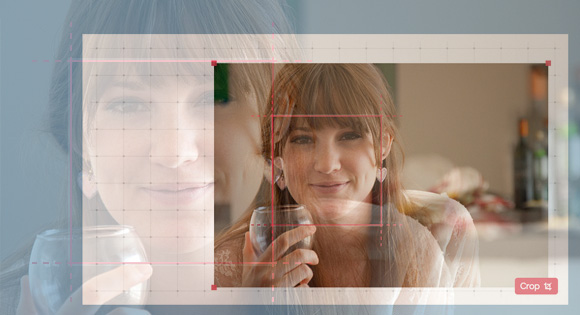
在本教程中,我们将学习如何使用 HTML5 <canvas> 元素调整图像大小和裁剪图像,当我们使用它时,让我们创建一些花哨的控件来调整大小,常见于照片编辑应用程序中。
在实际例子中,网站或应用程序可能会使用这样的技术在上传之前调整并构建个人资料图片。虽然我们可以在服务器上这样做,但它需要传输一个潜在的大文件,这是非常慢的。相反,我们可以在上传之前在客户端调整图像大小,这是快速的。
我们通过创建一个 HTML5 <canvas> 元素并以特定大小将图像绘制到画布,然后从画布中提取新的图像数据作为数据URI。大多数浏览器都对这些方法有很好的支持,所以你现在可以使用这种技术,但是只要注意一些与浏览器支持无关的限制,如质量和性能。
调整非常大的图像大小可能会导致浏览器减慢或在某些情况下,甚至崩溃。对文件大小设置合理的限制就像在上传文件时一样有意义。
好了,让我们开始吧!
HTML
让我们先来创建一个图像结构
<img class="resize-image" src="image.jpg" alt="Image" />
CSS
CSS也非常小。首先,定义 resize-container 和 image 的样式。
.resize-container {
    position: relative;
    display: inline-block;
    cursor: move;
    margin: 0 auto;
}

.resize-container img {
    display: block
}

.resize-container:hover img,
.resize-container:active img {
    outline: 2px dashed rgba(222,60,80,.9);
}
接下来,定义每个“调整大小控点”的位置和样式。这些是在图像的每个角落的小方块,我们可以拖动来调整大小。
.resize-handle-ne,
.resize-handle-ne,
.resize-handle-se,
.resize-handle-nw,
.resize-handle-sw {
    position: absolute;
    display: block;
    width: 10px;
    height: 10px;
    background: rgba(222,60,80,.9);
    z-index: 999;
}

.resize-handle-nw {
    top: -5px;
    left: -5px;
    cursor: nw-resize;
}

.resize-handle-sw {
    bottom: -5px;
    left: -5px;
    cursor: sw-resize;
}

.resize-handle-ne {
    top: -5px;
    right: -5px;
    cursor: ne-resize;
}

.resize-handle-se {
    bottom: -5px;
    right: -5px;
    cursor: se-resize;
}
JS
使用 JavaScript ,首先定义一些变量并初始化 Canvas 和目标图像。
var resizeableImage = function(image_target) {
    var $container,
    orig_src = new Image(),
    image_target = $(image_target).get(0),
    event_state = {},
    constrain = false,
    min_width = 60,
    min_height = 60,
    max_width = 800,
    max_height = 900,
    resize_canvas = document.createElement('canvas');
});

resizeableImage($('.resize-image'));
接下来,我们创建将立即调用的 init 函数。此函数使用容器包裹图像,创建调整大小控点,并创建用于调整大小的原始图像的副本。我们还将容器元素的jQuery 对象分配给一个变量,这样我们可以稍后再引用它,并添加一个 mousedown 事件监听器来检测有人开始拖动其中一个句柄。
var resizeableImage = function(image_target) {

// ...
    init = function(){

        // Create a new image with a copy of the original src
        // When resizing, we will always use this original copy as the base
        orig_src.src=image_target.src;

        // Add resize handles
        $(image_target).wrap('')
        .before('')
        .before('')
        .after('')
        .after('');

        // Get a variable for the container
        $container =  $(image_target).parent('.resize-container');

        // Add events
        $container.on('mousedown', '.resize-handle', startResize);
    };

//...

    init();
}
startResize 和 endResize 函数除了告诉浏览器开始注意鼠标移动的位置和停止的时间之外,其他操作非常少。
startResize = function(e){
    e.preventDefault();
    e.stopPropagation();
    saveEventState(e);
    $(document).on('mousemove', resizing);
    $(document).on('mouseup', endResize);
};

endResize = function(e){
    e.preventDefault();
    $(document).off('mouseup touchend', endResize);
    $(document).off('mousemove touchmove', resizing);
};
在开始跟踪鼠标位置之前,我们要对容器尺寸和其他关键数据点进行快照。我们将它们存储在一个名为 event_state 的变量中,并在调整大小时使用它们作为参考点,以计算出高度和宽度的变化。
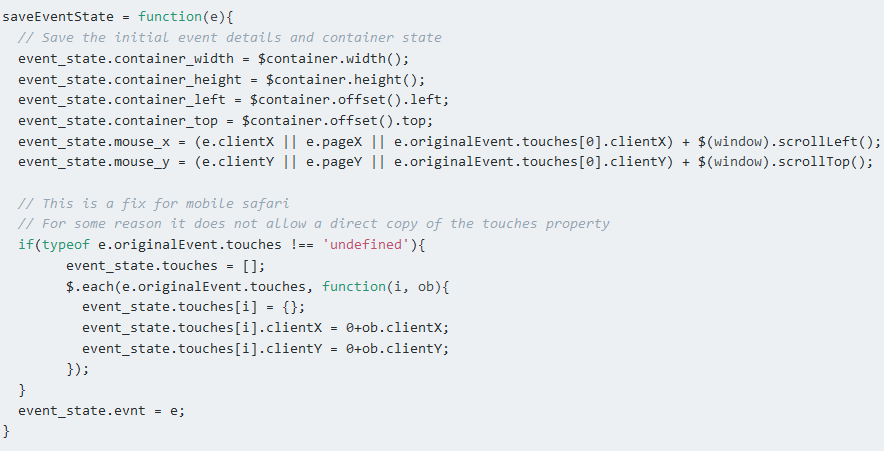
调整大小功能是大多数操作触发的地方。当用户拖动其中一个调整大小控制柄时,将不断调用此函数。每次调用此函数时,我们通过获取鼠标相对于我们拖动的角的初始位置的当前位置来计算新的宽度和高度。
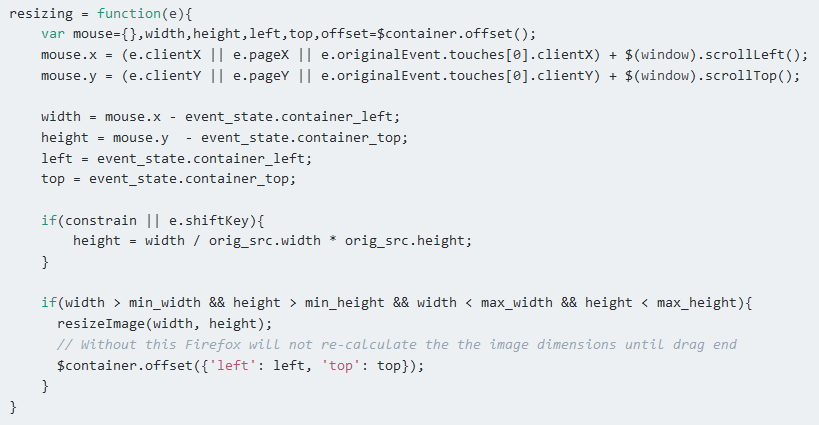
接下来,我们添加一个选项来限制使用 Shift 键或变量切换时的图像尺寸。
最后,我们调整图像大小,但只有当新的宽度和高度不在我们最初设置的最小和最大变量的边界之外时。
注意:因为我们实际上调整图像大小,而不只是改变高度和宽度属性,你可以考虑限制 resizeImage 的调用频率以提高性能。
实际调整图像大小
将图像绘制到画布与 drawImage 一样简单。我们首先设置画布的高度和宽度,并始终使用完整尺寸图像的原始副本。然后我们在 Canvas 上使用 toDataURL 来获得新调整大小的图像的 Base64 编码版本,并将其放在页面上。
resizeImage = function(width, height){
    resize_canvas.width = width;
    resize_canvas.height = height;
    resize_canvas.getContext('2d').drawImage(orig_src, 0, 0, width, height);
    $(image_target).attr('src', resize_canvas.toDataURL("image/png"));
};
太简单? 有一个小条件:图像必须与页面在同一个域上,或者在启用跨源资源共享(CORS)的服务器上。 如果不是,你可能会遇到一个关于“tainted canvas”的错误的问题。
从不同的角度调整大小
你现在应该有一个演示文档,但它不完整。目前,无论图像的哪个角被我们调整大小,都像是正在从右下角调整它。我们希望能够从任何角落调整图像的大小。要做到这一点,我们需要了解它应该如何运行。
当调整大小时,我们拖动的角以及其相邻边缘应该移动,而直接相对的角和其相邻边缘应该保持固定。
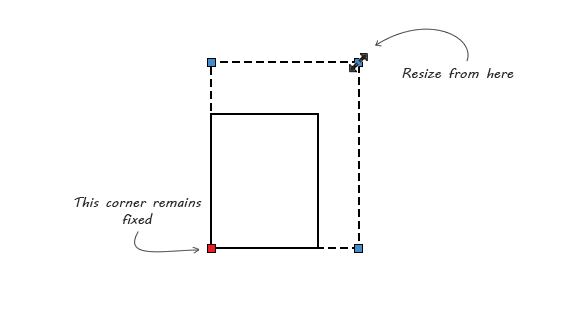
当我们改变图像的宽度和高度时,右边缘和底边缘移动,而顶边缘和左边缘将保持不变。 这意味着默认情况下,图像从其右下角调整大小。
我们不能更改此默认行为,但是当从除右下角之外的任何角度调整大小时,我们可以更改图像的总体位置,使其看起来好像相对的角和边缘保持固定。 让我们更新调整大小函数:
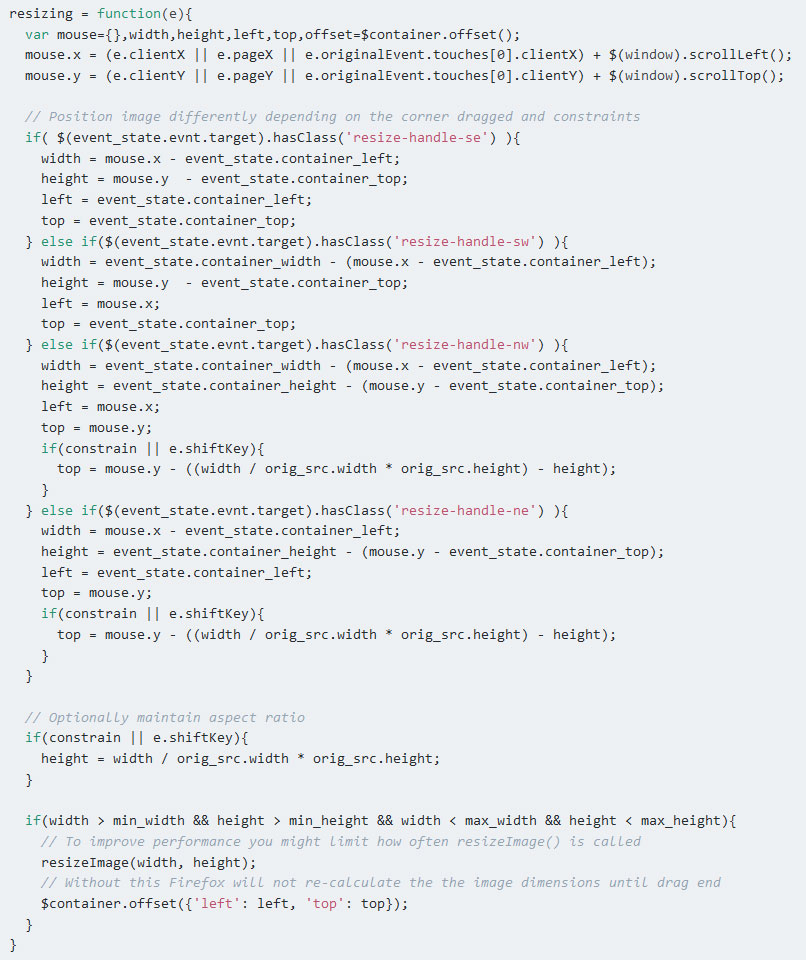
我们现在检查,看看哪个调整大小手柄已被拖动,我们正在移动图像,同时调整大小,使它看起来好像正确的角落保持固定。
移动图像
现在,我们可以调整图像的任何角落的大小,你可能已经注意到,我们可以无意中改变其在页面上的位置。我们需要让用户将图像移回帧的中心。在 init 函数中,我们添加另一个类似我们之前做过的事件监听器。
init = function(){

    //...

    $container.on('mousedown', 'img', startMoving);
}
我们现在添加 startMoving 和 endMoving 函数,类似于 startResize 和 endResize 。
startMoving = function(e){
    e.preventDefault();
    e.stopPropagation();
    saveEventState(e);
    $(document).on('mousemove', moving);
    $(document).on('mouseup', endMoving);
};

endMoving = function(e){
    e.preventDefault();
    $(document).off('mouseup', endMoving);
    $(document).off('mousemove', moving);
};
在函数移动中,我们需要计算出容器左上边缘的新位置。这将等于鼠标的当前位置,当我们开始拖动图像时,它偏移了鼠标离左上角的距离。

裁剪图像
现在我们可以调整图像的大小,我们可能想要裁剪它。不允许用户将图像裁剪为任何大小和形状,我们创建一个框架,需要有精确尺寸,并要求用户将图像放置在框架内。这使他们可以控制缩放和取景,确保最终图像始终具有相同的大小和形状。
为此,我们需要添加以下HTML:
<div class="overlay">
    <div class="overlay-inner">
    </div>
</div>
<button class="btn-crop js-crop">Crop</button>
覆盖框的样式很重要,特别是它的位置,宽度和高度,因为它们用于确定裁剪图像的哪个部分。还要记住,框架应该始终在任何背景颜色上可见。这就是为什么我在我的例子中在主框周围使用半透明的白色轮廓。
.overlay {
    position: absolute;
    left: 50%;
    top: 50%;
    margin-left: -100px;
    margin-top: -100px;
    z-index: 999;
    width: 200px;
    height: 200px;
    border: solid 2px rgba(222,60,80,.9);
    box-sizing: content-box;
    pointer-events: none;
}

.overlay:after,
.overlay:before {
    content: '';
    position: absolute;
    display: block;
    width: 204px;
    height: 40px;
    border-left: dashed 2px rgba(222,60,80,.9);
    border-right: dashed 2px rgba(222,60,80,.9);
}

.overlay:before {
    top: 0;
    margin-left: -2px;
    margin-top: -40px;
}

.overlay:after {
    bottom: 0;
    margin-left: -2px;
    margin-bottom: -40px;
}

.overlay-inner:after,
.overlay-inner:before {
    content: '';
    position: absolute;
    display: block;
    width: 40px;
    height: 204px;
    border-top: dashed 2px rgba(222,60,80,.9);
    border-bottom: dashed 2px rgba(222,60,80,.9);
}

.overlay-inner:before {
    left: 0;
    margin-left: -40px;
    margin-top: -2px;
}

.overlay-inner:after {
    right: 0;
    margin-right: -40px;
    margin-top: -2px;
}

.btn-crop {
    position: absolute;
    vertical-align: bottom;
    right: 5px;
    bottom: 5px;
    padding: 6px 10px;
    z-index: 999;
    background-color: rgb(222,60,80);
    border: none;
    border-radius: 5px;
    color: #FFF;
}
使用以下函数和事件侦听器更新 JavaScript:
init = function(){

    //...

    $('.js-crop').on('click', crop);

};

crop = function(){
    var crop_canvas,
        left = $('.overlay').offset().left - $container.offset().left,
        top =  $('.overlay').offset().top - $container.offset().top,
        width = $('.overlay').width(),
        height = $('.overlay').height();

    crop_canvas = document.createElement('canvas');
    crop_canvas.width = width;
    crop_canvas.height = height;

    crop_canvas.getContext('2d').drawImage(image_target, left, top, width, height, 0, 0, width, height);
    window.open(crop_canvas.toDataURL("image/png"));
}
裁剪功能与 resizeImage 函数类似,但是不是传递它的 height 和 width 值,而是从 overlay 元素获取高度和宽度。
对于裁剪,canvas drawImage 方法需要九个参数。第一个参数是源图像。接下来的四个参数指示使用源图像的哪个部分(剪切框)。最后四个参数指示在画布上开始绘制图像的位置以及以大小。
添加触摸事件和手势检测
我们添加了鼠标事件,现在让我们添加对启用触摸的设备的支持。
对于 mousedown 和 mouseup ,有等效的触摸事件,touchstart 和 touchend ,对于 mousemove ,有等效的 touchmove 。有人显然缺乏幽默感,因为这些事件可以很容易地被命名为“touchdown”和“touchup”。
让我们添加 touchstart 和 touchend 。
// In init()...
$container.on('mousedown touchstart', '.resize-handle', startResize);
$container.on('mousedown touchstart', 'img', startMoving);

//In startResize() ...
$(document).on('mousemove touchmove', moving);
$(document).on('mouseup touchend', endMoving);

//In endResize()...
$(document).off('mouseup touchend', endMoving);
$(document).off('mousemove touchmove', moving);

//In  startMoving()...
$(document).on('mousemove touchmove', moving);
$(document).on('mouseup touchend', endMoving);

//In endMoving()...
$(document).off('mouseup touchend', endMoving);
$(document).off('mousemove touchmove', moving);
由于我们正在调整图像大小,可能会合理地期望一些用户会尝试常见的手势,如双指缩放。有一个名为 Hammer 的库,为使用手势提供了很多方便。但是,由于我们只需要捏缩放,在我们的例子中,它可能会比较臃肿。让我告诉你在没有任何库的情况下检测捏放大小是多么容易。
您可能已经注意到,在 saveEventState 函数中,我们已经存储了初始触摸数据; 这将会派上用场。
首先我们检查事件是否包含两个“touches”并测量它们之间的距离。我们注意到这是初始距离,然后不断测量这个距离在移动时改变多少。让我们更新移动函数:
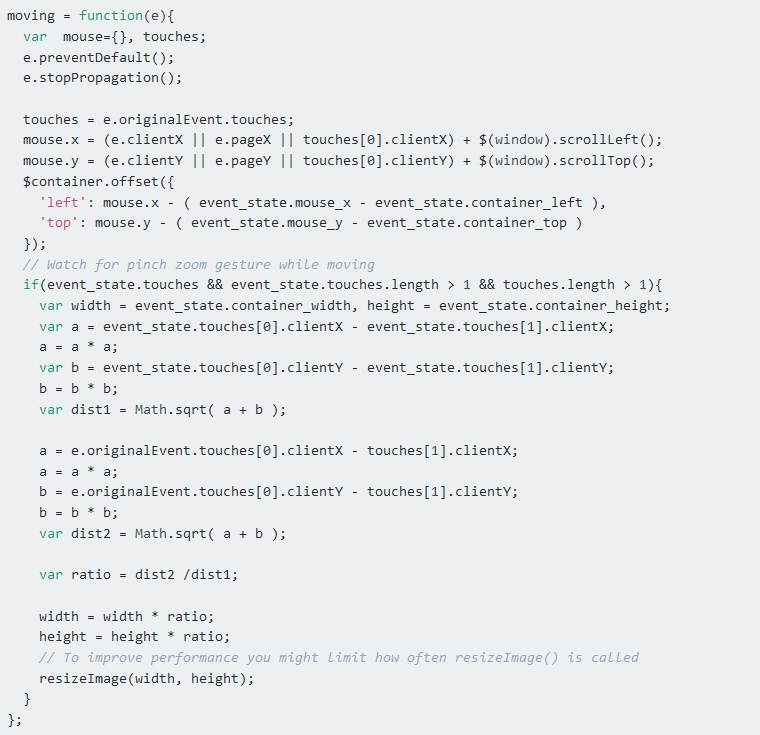
我们将当前距离除以初始距离,得到比例和图像的缩放比例。我们计算出新的宽度和高度,然后调整图像大小。
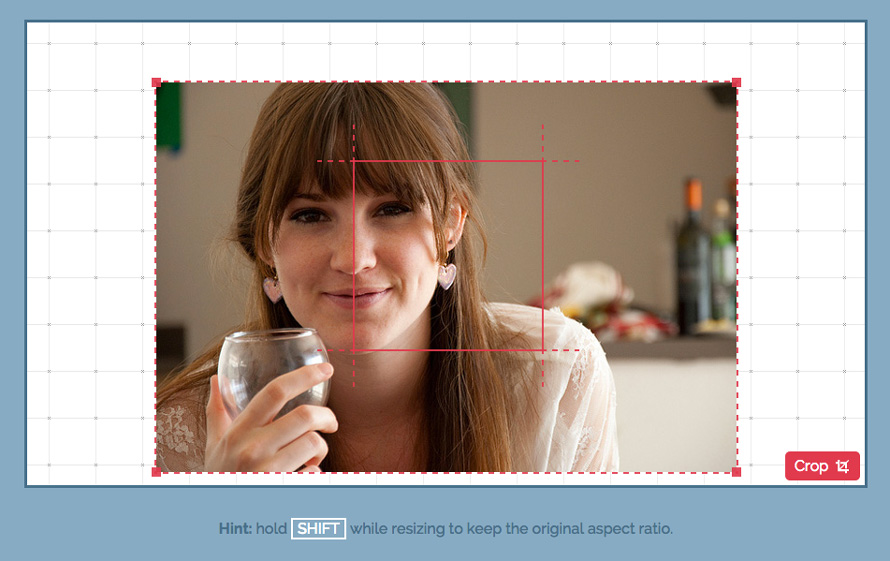
就是这样。 看看演示或下载ZIP文件。
在我的测试中,Chrome阻止了缩放的默认浏览器响应,这是更改页面缩放,但Firefox没有。

